
To maintain smooth traffic flow during the launch, the step-by-step blueprint includes inventory, redirection mapping, staging checks, analytics continuity, parity verification, and live QA.
Changing a website—a fresh design, switching to a new domain, or crafting a whole new platform—looks simple but is one of the toughest lifts for any business. When SEO is baked into each step, a well-planned move can speed up the page, improve the experience, and boost security. However, missed details can cause a nose-dive, stealing years of hard SEO work in the blink of an eye.
Real losses can happen fast. Consequently, a move that isn’t managed right can take a big chunk out of incoming traffic, search rankings, sales, and revenue. For example, the e-commerce brand moving from WooCommerce.com to Woo.com saw search traffic vanish by 90% in minutes. Likewise, the craft seller LoveCrafts lost 99% of its UK Google visibility during a rebrand and domain swap. This isn’t rare; the numbers back it. More than 80% of large data swaps run late or blow the budget, and barely 70% finish as planned. In short, most hiccups come from a few mistakes: skipping the roadmap, leaving SEO pros out early, teams talking past each other, and skipping early tests.
How well a website migration works isn’t judged on launch day. Success is built in the weeks and months before that moment. Therefore, the journey is about safeguarding and moving SEO value, and that value must guide every decision. This guide walks you through the migration journey. You’ll see a complete checklist that has delivered results already and can be the single roadmap any team should follow. By sticking to the checkpoints, project managers, developers, marketers, and business owners can turn a risky leap into a smooth glide. As a result, your digital footprint stays secure and the new site starts on a steady platform.
Pre-Migration Planning & Strategy
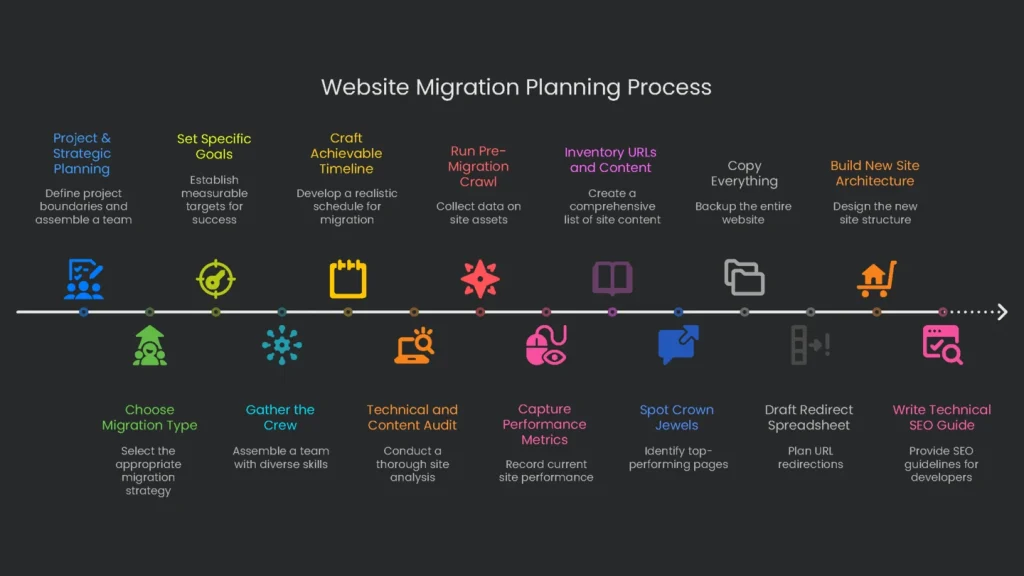
The planning phase, done weeks or even months before launch, is the most consequential step. Careful data gathering, a strategic roadmap, and a technical wireframe built in this phase eliminate the most frequent and harmful mistakes. In short, shortchanging planning is the leading cause of migration woes.
Project & Strategic Planning
Before developers touch any design, create the strategy every later decision will hinge on. First, outline the project’s boundaries. Next, assemble a skilled team. Finally, draft a practical timeline that balances ambition with the reality of the work ahead.
Choose the Migration Type and Set Goals
Before any work starts, everyone must agree on the project type. Not every move is the same, and your choice decides the risks. Therefore, classify the project clearly. Here are the most common types:
- Platform Change: A planned shift from one system to another, like moving from a hand-built CMS to WordPress, or from Magento to Shopify. Expect URL paths to be shaken up.
- Domain Change/Rebrand: The whole site hops from one web address to another, like oldbrand.com to newbrand.com. This one tends to be scariest for search engines.
- Site Redesign/Restructure: The look and structure change, but the web address stays the same.
- Protocol Change: The site switches from HTTP to HTTPS. This is now a must for both security and search ranking.
- Content Consolidation: Several smaller sites or subdomains get merged into a single main domain.
With the category set, the crew must nail down specific, measurable targets. Think of these as the lighthouse for the project. For example, you might aim to get Core Web Vitals into the green, boost search-driven purchases by 15%, or roll three country sites into one global version. Consequently, firm goals set the heading for every later decision.
Gather the Crew and Set the Cast
Moving a site is messy and gets messy faster without a plan. Therefore, you need a crew that includes a voice from every crucial department. The core crew is:
- Project Manager: The go-to person who keeps deadlines, budget, and communication on track.
- SEO Specialist: Joins early, guarding traffic and rankings.
- Web Developers (Frontend & Backend): Build the new site and ensure every page is search-friendly.
- Designers (UX/UI): Shape how the site feels and looks, so visitors know where to go.
- Content Writers/Strategists: Move, rewrite, and polish copy for clarity and impact.
- Data Analysts: Set up tracking to compare performance before and after launch.
The most common reason migrations stumble is simple: the team isn’t aligned. To fix this, appoint one project manager who can make tough calls. Then set up a single project-management tool—whether Asana, Trello, or a shared Google Sheet—to hold all tasks, people, and deadlines. As a result, everyone knows who’s on deck and when things must ship.
Craft an Achievable Timeline
Start with the launch date and work backward. Pad the calendar for the curveballs that always come. Next, plan to launch when traffic is low: a weekend, a holiday break, or another slow season. That way, any hiccups affect fewer users. In addition, set a content freeze window. No new articles or changes go live the night before and through the migration weekend. Therefore, nothing slips through the cracks that the redirect sheet doesn’t catch.
Technical and Content Audit
This phase assembles a detailed, data-driven snapshot of the site. That data powers the redirect map and becomes the yardstick for success when you press go-live.
Run a Full Pre-Migration Crawl
Run the crawl before you change any page, picture, or post. The list should include every asset—URLs, images, and metadata. A tool like Screaming Frog or Sitebulb does the heavy lifting. Consequently, you’ll have an asset map you can rely on, which reduces surprises. The crawl needs to capture these for every URL:
- URL of the page
- Status code (200 OK, 301 Moved, 404 Not Found)
- Page title
- Meta description
- H1 and H2 headings
- Link in the canonical tag
- Any hreflang annotations
- Image URLs and their alt text
- File size and word count
Also crawl non-HTML files—PDFs, images, and videos—since they can rank and drive traffic. Otherwise, missed files can trigger “404 Not Found” errors post-launch.
Capture Current Performance Metrics
After the crawl, take a complete snapshot of current performance. Knowing today’s state helps you flag top pages that need extra care and sets a clear baseline. Therefore, put all KPIs into a central dashboard. The table below lists the most important metrics to record.
| Metric Category | Specific KPI | Data Source |
| Organic Traffic | Organic Sessions (Last 30/90 days) | Google Analytics 4 |
| Top 100 Organic Landing Pages | Google Analytics 4 | |
| Keyword Rankings | Top 3 Keyword Count | GSC / Ahrefs / Semrush |
| Top 10 Keyword Count | GSC / Ahrefs / Semrush | |
| Top 50 Keyword Count | GSC / Ahrefs / Semrush | |
| Conversions & Engagement | Total Organic Conversions / Revenue | Google Analytics 4 |
| Average Time on Page / Engagement Rate | Google Analytics 4 | |
| Bounce Rate | Google Analytics 4 (if applicable) | |
| Technical Health | Core Web Vitals (LCP, INP, CLS) | PageSpeed Insights / GSC |
| Crawl Errors (4xx, 5xx) | Google Search Console | |
| Total Indexed Pages | Google Search Console | |
| Backlink Profile | Total Referring Domains | Ahrefs / Semrush |
| Top 10 Backlinks by Domain Rating (DR) | Ahrefs / Semrush |
This benchmarking template turns a vague task into a focused checklist. In addition, tagging a snapshot in Google Analytics the night before cutover makes before-and-after comparisons automatic.
Inventory All URLs, Content, and Links
Assemble a master list of every site URL by merging data from these sources:
- A full export of the site crawl from Screaming Frog.
- A report of your best organic landing pages from Google Analytics.
- An export of top-performing pages from Search Console.
- Pages with the most backlinks from a tool like Ahrefs or Semrush.
Blend these sources and you’ve got a complete master list, ready for a content audit. Not every page is worth keeping. Therefore, weak or outdated content can go. Apply the “6 Rs” for each page:
- Reformat
- Repurpose
- Refresh
- Retire
- Redirect
- Retain
Spot and Safeguard Your Crown Jewels
From the master list, identify the top pages that drive the most value. These “crown jewels” need special attention. Rank them by organic traffic, revenue contribution, quality backlinks, and important keywords. Consequently, this prioritized list guides manual checks on staging, during launch, and for several days after to catch any slips.
Copy Everything, Just in Case
Before you roll up your sleeves, take a full, double-checked backup of the entire website. Pull down every file, every image, and the database. Treat this copy like a parachute—open it if launch turns into a free fall. In addition, wait before deleting the old website. Keep it online for a full week of traffic first. That way, if the new launch spins, you have a smooth landing.
Draw the Perfect Site Blueprint
With the current site mapped and performance reviewed, it’s time to steer the new site on paper. You will hammer on two big plans: the list of new web addresses and a sheet with every flavor of technical SEO. Let’s dive in.
Drafting the Redirect Spreadsheet
The URL Redirect Map is the heartbeat of any website move. Get it wrong and you risk losing rankings and annoying visitors. Therefore, keep it tidy. In an Excel or Google Sheet, list the old URL in Column A and the new URL in Column B. Pair every kept URL one-for-one with its new page. Consequently, inbound link equity flows to the new address.
For old pages you plan to remove, send visitors to the nearest match. Don’t push everything to the homepage; search engines may treat old topics as dead, and users will be frustrated. Moreover, mark every entry as a 301 (Permanent). Using a 302 (Temporary) here whispers that the change is only a test, which can stall link equity and rankings.
If you’re upgrading tens of thousands of pages and URL changes follow a pattern, server rules and regular expressions (regex) can handle them in a batch. This saves time. Still, keep a one-to-one mapping sheet for exceptions and “crown jewel” pages you cannot misplace.
Build the New Site Architecture
A migration is the perfect moment to sew a fresh, tidy information architecture that helps users and search engines. Keep your most important pages within three clicks of the homepage. Next, update all internal links to point directly to new URLs. Never rely on redirects for internal links. Redirect chains slow pages, bother users, and eat into the search engine’s “crawl budget”—the daily quota of pages a search engine reserves for you.
Write a Technical SEO Guide for Developers
Don’t assume your dev team has every SEO detail covered. Provide a clear SEO Specification Document with requirements such as:
- Title Tags and Meta Descriptions: Character limits and keyword placement.
- Canonical Tags: Rules for managing duplicates and pagination.
- Structured Data: Correct Schema.org types for key templates, like Product and Article.
- Image Optimization: Descriptive alt text, size limits, and modern formats like WebP.
- Core Web Vitals: Targets for LCP, INP, and CLS.
- XML Sitemap: Standard location and structure so crawlers can find it easily.
Sending this checklist now avoids expensive fixes later and plants solid SEO practices before go-live.
Get Ready—Staging & Testing
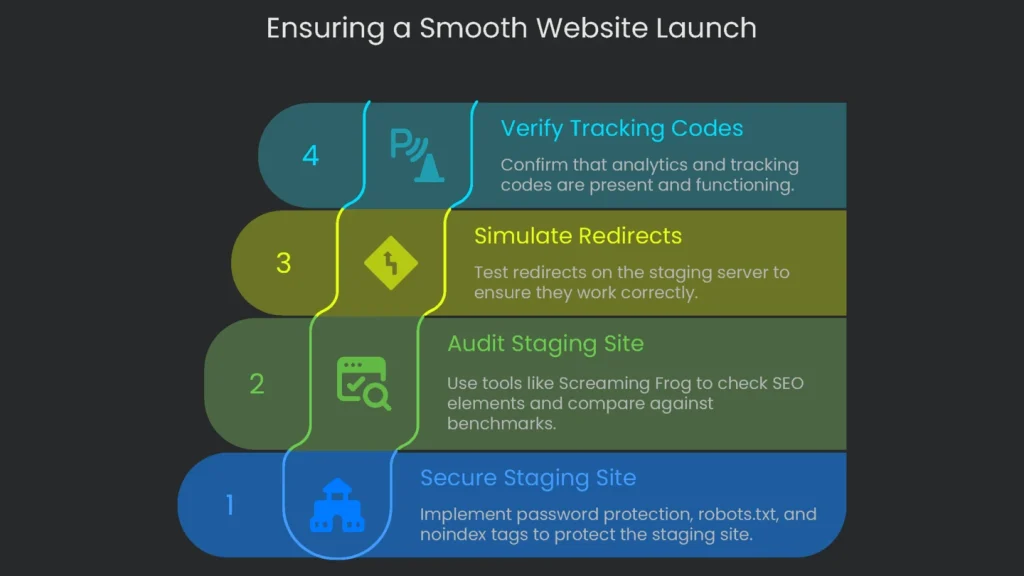
Staging is your last chance to catch big problems without touching the live site. Think of it as a dress rehearsal. If you skip it or rush, the main performance can fall flat.
Lock Down Your Staging Site
Hide Your Staging Site from the World
This step isn’t optional. If Google crawls your staging site, it can create a messy pile of duplicate content. To keep staging secret, set up three layers of protection:
- Password Gate: Use HTTP authentication to lock down the whole site.
- Robots.txt: Add a line to the staging server’s robots.txt file to ask crawlers to stay away. Type in:
User-agent: *
Disallow: /
That tells polite bots not to peek.
- Noindex Tag: Add a noindex meta tag on every page:
<meta name=”robots” content=”noindex”>
This tells search engines that none of the pages should show up in results. Layering all three shields gives solid protection and peace of mind.
Staging Site Audit
With staging locked down, run a quick checklist to ensure SEO parity. Grab a crawler like Screaming Frog and let it rip. Then, compare the new report to your benchmarks. Here’s what to check:
- All title tags, meta descriptions, and H1s match the move plan.
- Canonical tags point to the right version of each page.
- No internal links return 404s.
- Structured data and hreflang validate correctly.
- Spot any other differences between the checklist and what’s published.
Simulate Redirects on Staging
This is the secret sauce for a drama-free launch. Don’t wait for launch day; test redirects on staging:
- Stage the Rules: Upload the full redirect map to the staging server.
- Load Old URLs: Take the old-URL list straight from the map.
- Crawl the List: Use Screaming Frog’s List Mode against the staging site.
- Analyze Results: Each URL should return 301 (Permanent) and point to the correct new URL.
- Re-crawl Targets: Crawl the destination URLs; they should return 200 (OK).
This organized check proves your redirect plan before anything touches the real site, so the live domain stays safe.
Check that Analytics and Tracking Codes Are Present
Tracking scripts often get missed, and the result is unrecoverable data loss. Therefore, confirm all code on staging: Google Analytics 4, Google Tag Manager, and any ad pixels. Tools like Tag Assistant for Chrome and the GA4 DebugView show whether tags fire. To avoid polluting real data, use a separate GA4 property for testing. Inside GTM, a lookup table can switch the Measurement ID for staging hostnames.
The Launch Day

Launch day is where every ticket, meeting, and last tweak comes together. It must run like a synchronized clock. Therefore, keep chatter short, breathe, and don’t click randomly just because you’re in the zone.
The Launch Day Action Plan
No soft start. The plan is concrete.
T-minus 1 Hour: Final Check
Weird flashes of doubt? The last hour is check, check, double-check.
- Last Backup: Take one more fresh image backup of the live site.
- Confirm TTL: Confirm DNS TTL was lowered in the last 48 hours to about 5 minutes.
Now leap with a steady hand.
The Go-Live Sequence
Follow the steps below to avoid glitches:
- Maintenance Mode: Turn it on and show a short message. Users cannot browse, check out, or change records during the switch.
- Update DNS: Point the A/AAAA record from the old IP to the new IP.
- Remove Blocking Flags: When the new site goes live, remove all staging blocks immediately.
- Clear any password locks.
- Edit robots.txt to allow crawling.
- Delete all noindex tags.
If you skip this, Google treats your shiny new site like a ghost town and won’t deliver it to anyone.
- Publish the Final 301 Redirects: Flip the switch so every old URL sends users to its new home.
- Turn Off Maintenance Mode: Open the doors. The new website is live and ready.
Telling Search Engines About the Switch
Submit the New XML Sitemap
Once live, create and publish the updated XML sitemap. It should list only the final pages you want indexed, and every URL must return 200 OK. Then submit it in Search Console for the new site. For example, the sitemap often lives at https://www.newsite.com/sitemap.xml. Remember, this flags content for crawling, not instant discovery.
Use the “Change of Address” Tool in GSC
Google Search Console’s Change of Address tool matters when the entire domain is moving. Use it when the site changes from old-domain.com to new-domain.com and all content transfers.
Don’t use it for HTTP→HTTPS upgrades, folder reorganizations, or www to non-www changes. Following this guideline helps Search Console process and index pages correctly.
- Launching it: From the old site’s Search Console, go to Settings → Change of Address. Pick the new site’s verified property and click “Validate & Update.” If all checks pass, Google starts moving signals and shows a notice for 180 days.
Right After the Go-Live Inspection
Going live doesn’t mean you’re done. The first hours are your last chance to catch hidden bugs.
- First New Crawl: Run a complete crawl with Screaming Frog. Watch for:
- 5xx Server Errors: Core server issues to fix fast.
- 404 Not Found: Broken internal links or redirect map gaps.
- Redirect Tangles: Loops or long chains that slow users.
- Manual Double-Checks: Visit your “crown jewel” pages. Ensure they load, old URLs redirect correctly, and key actions—forms, carts, logins—work.
Post-Launch Watch & Fix

Launch day deserves high-fives, not rest. The next weeks are your watchtower, catching quirks before they grow.
Close Metrics Watch
Priority one is tracking metrics so you can spot nosedives early. Small wiggles are normal. However, long, steep drops mean the site needs help.
Daily Reports—Weeks 1-2
For the first fourteen days, check these reports without fail:
- Google Search Console: Monitor both old and new properties.
- Index Coverage: Fewer indexed pages on the old site and more on the new site signal good progress.
- Errors: New 404s or 5xx server errors need fast fixes.
- Crawl Stats: Watch for spikes in response times; hosting may be struggling.
- Analytics (GA4): Check real-time organic traffic and compare day-over-day and week-over-week. Focus on top organic landing pages.
- Rank Tracking: Track priority keywords daily. Small moves are normal; big, lasting drops may signal redirect or indexing issues.
Weekly Monitoring (Weeks 3-4+)
Once things stabilize, switch to weekly checks. Continue monitoring the same KPIs, but focus on trends. Each week, compare results against your pre-migration benchmarks.
Systematic Cleanup
While metrics roll in, conduct systematic checks to fix remaining issues.
- Re-check Redirects: About a week after launch, re-audit the entire redirect matrix using the original old-URL dump in Screaming Frog’s List Mode. Look for 301s across the board.
- Fix Broken Links: Combine your fresh crawl with Google Search Console reports to find broken internal links. Use the GSC “Links” report to spot broken external links, then issue 301s to keep link equity flowing.
Plan for the Future
Now move from firefighting to long-term gains and stability.
Backlink Reclamation and Outreach
Even though a 301 redirect carries most link value, a fresh direct link is best. Research suggests the new link sends 100% of the authority. Therefore, reach out to the sites sending your strongest backlinks:
- Export Backlinks: Pull all backlinks pointing to old URLs from Ahrefs or Semrush.
- Prioritize by Authority: Sort by authority—e.g., Domain Rating—and start at the top.
- Targeted Outreach: Email the top sites. Thank them, note the domain change, and provide the new URL.
Manual notes take time, but they protect your strongest links for the long run.
How Long to Maintain Redirects
How long should 301s keep working? There’s an official minimum, but most SEO teams keep them much longer. Until you’re 100% certain traffic and link equity have stabilized, keep the path open.
- Google’s Official Guidance: Keep a 301 running for at least 180 days. This matches how long the Change of Address notice remains in Search Console, so it’s a common benchmark.
- Web Community Recommendation: Keep redirects and the old domain for a minimum of one full year, often longer. Renewing a domain is cheap insurance against lost traffic, dropped rankings, and brand risk if someone else buys it.
Takeaway: Guard the Small Things
Migration success comes from previewing each small step, crunching the numbers, and watching dashboards for tiny dips. It isn’t luck; it’s keeping SEO in the conversation from the start. Problems—traffic drops, falling rankings, and lost sales—are often byproducts of haste. Therefore, prep is where the real work happens. The outcome rides on a complete crawl, precise performance metrics, and a finalized URL redirect map. Consequently, with reliable staging tests, a risky leap becomes a predictable step.
This checklist walks you, point by point, through the move. It reads like a user manual for developers and marketers side by side. Ready to move? You can’t afford to flip a coin. Call the Technicalseoservice crew and partner with the folks who know every twist. A smooth, hassle-free move is within reach, and protecting the SEO value you’ve built starts with seasoned pros.
Implementation steps
- Lock down the content freeze, export the full URL list for redirect planning.
- Clone content, meta, and schema to staging; check rendering and CWV loading.
- Go live with 301 redirects, updated sitemaps, and tracking/goals set up.
- Review server logs or GSC logs each day for errors; patch them pronto.
- Perform a post-launch crawl to check for equality and rescue broken links
Frequently Asked Questions
What do I need to list?
Every live URL, title tags, canonical tags, redirects, and template files.
What has to work on launch day?
One-redirects, parity checks, sitemaps, and the right analytics tags.
How do I check that launch day was a success?
Crawl the site, skim the logs or GSC, and fix 404s right away.
Should I change everything at once?
Skip that—too many changes confuse root cause checks.
How long until traffic steadies?
Weeks, usually—keep tweaking and tracking.