
To eliminate page jank, media-space reservation for the background, preload the fonts, and restrain third party resources. This manual ranks actions in order of estimated impact, so visual stability can increase in a short time.
Among the web performance scores you keep an eye on, Cumulative Layout Shift (CLS) is the one most tied to what users feel right away. It’s the behind-the-scenes reason you’re about to click the play button on a video, and the button changes spots, making you accidentally subscribe instead. Or you’re halfway through a recipe, and a recipe card with a tall banner ad suddenly slides in. Consequently, the text slides away, and you fumble the scroll. Those jumps look tiny. However, to a browser, an ad network, and a search engine, they add up to a visible wobble—actual proof the page is unstable. As a result, that instability can lead to regrettable clicks and even orders you didn’t mean to place.
What is CLS?
Think of CLS like a score for how “plucky” a page can be. Therefore, you can learn from the best teachers. The page rates itself by watching all the jumps that weren’t scheduled to happen. A jump counts any time something you can see suddenly changes position—an image loads and moves the text, or a button grows as the font loads. In short, a bad CLS score means visitors stare at a page that never stands still. Each shudder reminds them the page can’t be trusted.
Why CLS Matters for UX and SEO
The moment a user feels a page shift, patience runs out—even before the page finishes loading. Therefore, when they complain to their friends off-screen, the danger grows that your bounce rate will climb. Search engines see the same jitter on their developer monitors and detect instability that scares off users. Consequently, a right layout now means a score you can brag about and search ranks you want customers to see.
Google wraps Core Web Vitals, including Cumulative Layout Shift (CLS), into its “page experience signals,” which is one small spoke in the larger search ranking wheel. Sure, it’s one cog among thousands. However, if you’re losing the CLS race, a drop in ranking is more likely, especially in niches where a smooth ride matters to visitors. As a result, the traffic you have can leave in a hurry. One wiggle can cost clicks. Empty real estate and jumpy text can turn curious users into frustrated clickers, firing their mice against shuffle headlines in “rage clicks.” Finally, the page is counted as a bounce, and dollars roll away, since more instability means steeper drop-offs during checkout. Taming your CLS isn’t just about shiny numbers—it’s about handing users a dependable page and building trust one stable millisecond at a time.
Good CLS Scores
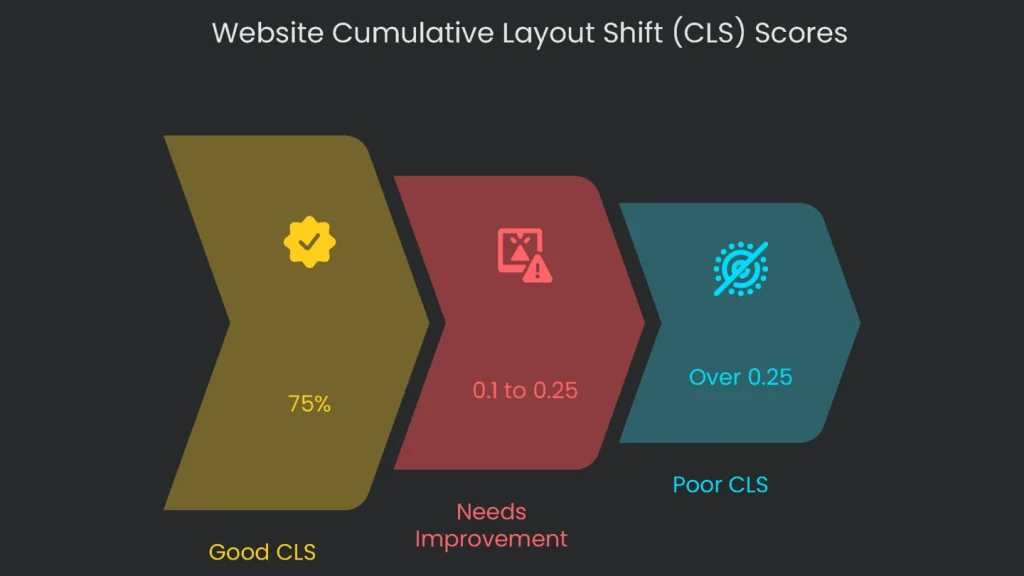
Google has lined up a simple CLS score for devs and SEOs to target. Think of CLS like a balance check for how much stuff moves when a page loads. The best score is zero, which means nothing wobbled at all. Here’s how the grades work:
- Good: Keep your CLS at 0.1 or lower. That’s your goal.
- Needs Improvement: 0.1 to 0.25 means some things are sliding, and it’s time to patch them.
- Poor: Anything over 0.25. That’s a visual earthquake for users, and it probably hurts how long they stick around.
The overall target is for 75% of all visitors, whether on a phone or desktop, to see a score of 0.1 or lower. Consequently, that’s the number you need to hit to check “passed” on the Core Web Vitals test.
Diagnosing CLS: Lab vs. Field Data
Before you can squash those annoying layout shifts, you have to track down what’s making them jump. One confusing part is when the testing tool and the everyday user experience fight over the truth. For example, you might run a lab tool and walk away feeling like a rock star, only to discover the real user report with the dreaded “Poor” CLS label affecting thousands of visitors. Therefore, seeing how wide that gap can be is the first thing you need to nail for a solid diagnosis.
The gap exists because you actually get two kinds of performance info: lab data and field data. Lab data runs in a controlled environment—think perfect conditions at the developer’s desk—so the results shine. Field data, on the other hand, is what real visitors experience on different devices, networks, and at different times. That’s where the real story hides, and where the jumps seem to come out of nowhere.
- Lab data is gathered while running a test in a controlled setting. When a tool such as Lighthouse is kicked off, it opens the page one time on a pretend phone or tablet. This is useful for spotting problems that pop up while the page is loading for the first time.
- Field data—often called Real User Monitoring or RUM—comes straight from real visitors on your website. Because of that, it’s the data that Google uses to calculate Core Web Vitals.
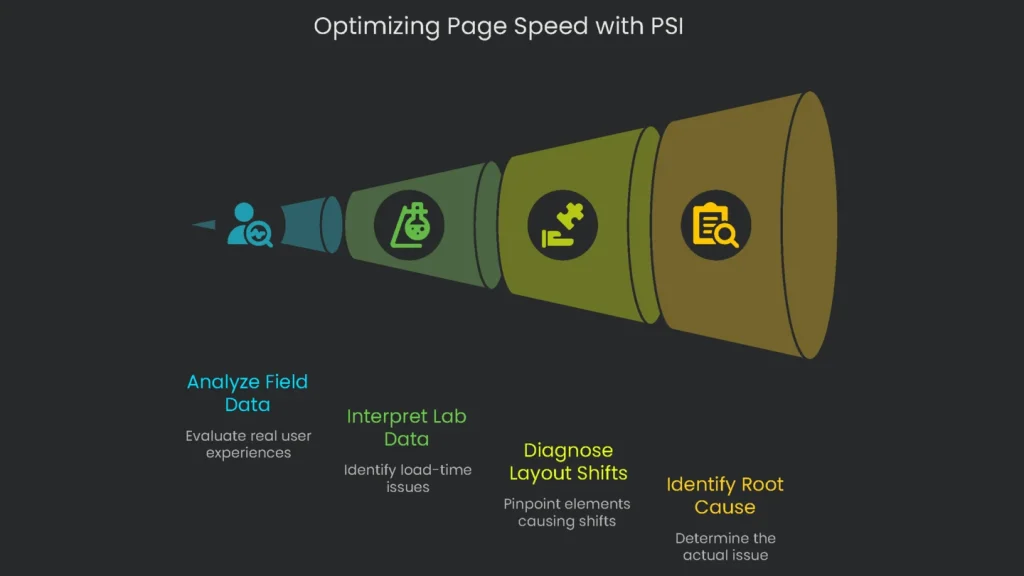
The biggest difference is that lab tools focus on what happens during the first load, while field data follows what happens for the entire time a user has the page open, right to tab close. Therefore, things triggered by user behavior—like a user scrolling and causing a lazy-loaded image to pop in without space reserved—show up in field data but not in a lab test. The message is to use a two-step checking routine. First, run PageSpeed Insights for a quick overview. Next, dive into Chrome DevTools for interactive, in-depth investigation to find what those lab tools are missing.
Using PageSpeed Insights
PageSpeed Insights is the easiest starting point for checking how fast your page is. It has field and lab data in one simple report, saving you the trouble of gathering info from different tools. Consequently, you get a fast snapshot and a path to action.
How to Run a PSI Test
- Head to PageSpeed Insights in your browser.
- Type the full URL of the page you want to test.
- Click the “Analyze” button and let it think for a few seconds.
The report you see first shows mobile data by default. However, you can switch tabs to view desktop.
How to Read the Report
The PSI report has two main areas to check, and you want to treat them separately.
- See what your real users see (Field Data): This part shows how real Chrome users experienced the page in the last 28 days. It holds the most weight for your Core Web Vitals score. If the CLS score here is bad, you have a genuine issue for real people, even if the lab numbers below look fine.
- Find what slows the page down (Lab Data): This area simulates a single page load in a lab. The CLS score here only counts the layout shifts in that one run. If the score is high, it spots a load-time shift issue, and those are usually pretty straightforward to fix.
Finding the Problem Elements
When your lab score has any CLS number that isn’t zero, scroll straight to the “Diagnostics” section. You’ll see a checklist titled “Avoid large layout shifts.” Inside this checklist, you can see which parts of the page (the DOM elements) moved during the test, plus how much each part added to the CLS score. That detail points to the exact spots you should check first. However, be aware that the item flagged is often the one being pushed, not the one that caused the push. For example, a banner added at the top can shove the main heading down, so the audit flags the heading. A sharp developer looks one section up to the banner that was thrown in without any reserved space.
Deep Dives with Chrome DevTools
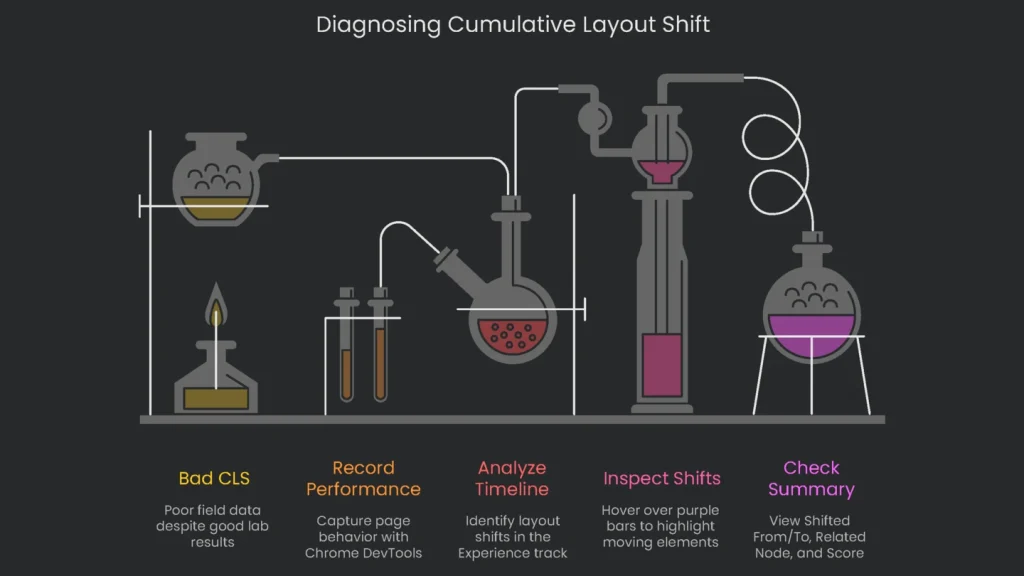
If the lab gives you a perfect CLS score while field data stays bad, Chrome DevTools is your trusty follow-up. The Performance panel will show every tiny page movement, step by step, even shifts that happen after the page is visible. Consequently, you can trace issues that appear later in a session.
How to Record a Performance Profile
- Launch your page in the Chrome browser. You’ll want the page open and ready to roll.
- To launch DevTools, right-click anywhere on the page and choose “Inspect,” or press Ctrl+Shift+I (Windows/Linux) or Cmd+Option+I (Mac).
- Head to the Performance tab.
- For capturing CLS during load, hit “Start profiling and reload page.” DevTools will track the whole sequence and stop on its own.
- To get CLS data after load, click “Record.” Move around the page like a real user: scroll, hover, and open menus.
- Tap “Stop” when you’re finished. This technique is useful to check why lab results and on-the-road tests differ.
Tracking CLS with the “Experience” Report
After you stop the recording, the Performance panel displays a complete timeline. Look for the track labeled “Experience” to spot layout shifts. In that track, layout shifts are shown with purple bars.
- If you hover over a purple bar, the feature will highlight the element that just moved.
- Tap any purple box to see extra info right away in the Summary tab at the bottom.
Need something faster? Turn on “Layout Shift Regions.” Head to DevTools Settings > More Tools > Rendering, and check the box for “Layout Shift Regions.” As you browse the page, any element that jumps will flash blue for a split second. This way, you see the movement as you scroll.
Now, the Summary tab gives you the last few hints the page offers. When you pick a layout shift, the tab presents:
- Shifted From / Shifted To tells you exactly where the element started and ended.
- Related Node shows you which part of the page moved.
- Score shows the grade for that individual movement.
This info shows you which element shifted and when, making it easier to follow the problem back to the line of code that started it. For example, it could be a picture without a size, a slow-loading ad, or any live, changing element.
Quick Fixes for the Most Frequent CLS Problems
Once you spot the culprit, you usually need to tackle one of four typical problems. The main idea behind all the fixes is the same: tell the browser the right amount of room to hold before something has finished loading. Consequently, the layout stays steady.
Problem 1: Images and Videos That Miss Dimension Codes
This one is the biggest culprit behind CLS, especially on sites that pack a lot of visual content. Therefore, start here.
The Problem: Missing Size Info
When a web browser loads a page and stumbles upon an <img> or <video> tag that doesn’t have width and height set, it can only guess. It saves a box that is zero height, which is a bad guess. Later, when the image or video actually arrives, the browser finds out it’s 600×400 pixels and has to rearrange the whole page, shoving everything lower. This is called layout shift, and it doesn’t feel great—especially if you were about to click a button.
The Fix: Set Those Attributes
The simplest way to keep the page looking smooth is to always add width and height attributes to your <img> and <video> tags. Just put the exact size that the file really is, and the browser can reserve the proper space ahead of time. As a result, everything stays in place, and the page loads cleanly.
HTML
HTML
<img src="your-image.jpg" width="600" height="400" alt="An example image.">
Adding width and height in the markup lets the browser see the size of the image before it is even downloaded. Therefore, the page reserves the right spot right away, and no weird jumps happen when the image finally appears.
Width and Height in Responsive Design
A while back, developers were told to drop the width and height settings and let CSS rules like max-width: 100%; and height: auto; control size. This confused some folks, who worried that bringing those attributes back would wreck their layouts. Don’t worry. Modern browsers have good sense. They work fine when you put both attributes in the HTML and also use responsive CSS. The browser reads width and height to figure out the aspect ratio and sets aside the right vertical space. The CSS still decides what final width to use. Therefore, height: auto; keeps the height in sync as the width changes. Giving width and height in the markup is now a must for keeping responsive images from jumping and for keeping the page stable.
Master Smooth Images That Resize Well
To keep images both flexible and steady while loading, marry HTML tricks with srcset, sizes, and smart CSS so different devices get exactly what they need.
HTML
HTML
<img
  width="1600"
  height="900"
  src="image-1600.jpg"
  srcset="image-800.jpg 800w, image-1200.jpg 1200w, image-1600.jpg 1600w"
  sizes="(max-width: 768px) 100vw, 768px"
  alt="A responsive image."
>
CSS
CSS
img {
  max-width: 100%;
  height: auto;
}
Why this works:
The width and height keep the browser confident the picture plays at 16:9, so no surprise resizing. Meanwhile, srcset offers three options, and sizes tells which one to serve based on the viewport. Consequently, CSS unlocks free resizing without quirky distortions.
Guilty Culprit: Ads, Iframes, and Embeds
Sponsored posts, embedded YouTube clips, and tweets act like images but are trickier. Their space is often tapped late and controlled elsewhere, causing jerks on the page. Therefore, reserve space early.
Show-Stopper Fix: Grab—and ration—the ratio
With the new aspect-ratio CSS rule, declare a width–height pair on the parent so the embed knows how much real estate to keep. Consequently, the layout stays beautiful while content loads. For example, to keep a 16:9 YouTube video fitting perfectly, wrap your iframe in a div and lock the aspect ratio. The video won’t stretch or squish, no matter the screen size.
HTML
HTML
<div class="video-container">
  <iframe src="https://www.youtube.com/embed/..." title="YouTube video player" allow="accelerometer; autoplay; clipboard-write; encrypted-media; gyroscope; picture-in-picture" allowfullscreen></iframe>
</div>
CSS
CSS
.video-container {
  width: 100%;
  aspect-ratio: 16 / 9; /* Keeps a 16:9 frame even before loading */
}

.video-container iframe {
  width: 100%;
  height: 100%;
  border: 0;
}
The code sets a 16:9 box that holds the future drawing space. Therefore, the page doesn’t jump when the video appears. It’s simpler and faster than the old padding-fraction methods.
Strategic Placement for Ads
Handle ad placeholders the same way:
- Reserve the Biggest Size: Size the box for the largest ad. If a smaller one appears, you’ll show blank space, not a jump. Blank is safe; sudden loads are annoying.
- Place It Lower: Put the ad slot below the first view. Consequently, it won’t load while the top part is open, so the CLS score stays steady before users scroll.
Cause 3: Fonts Swapping Messing with Layout
Fonts on the web can make a site look awesome, but they can also make things jump if they’re loaded the wrong way. The jump happens when the browser has to switch between fonts. Therefore, control how and when they load.
The Problem: FOIT vs. FOUT
You usually run into one of two issues when a browser deals with fonts.
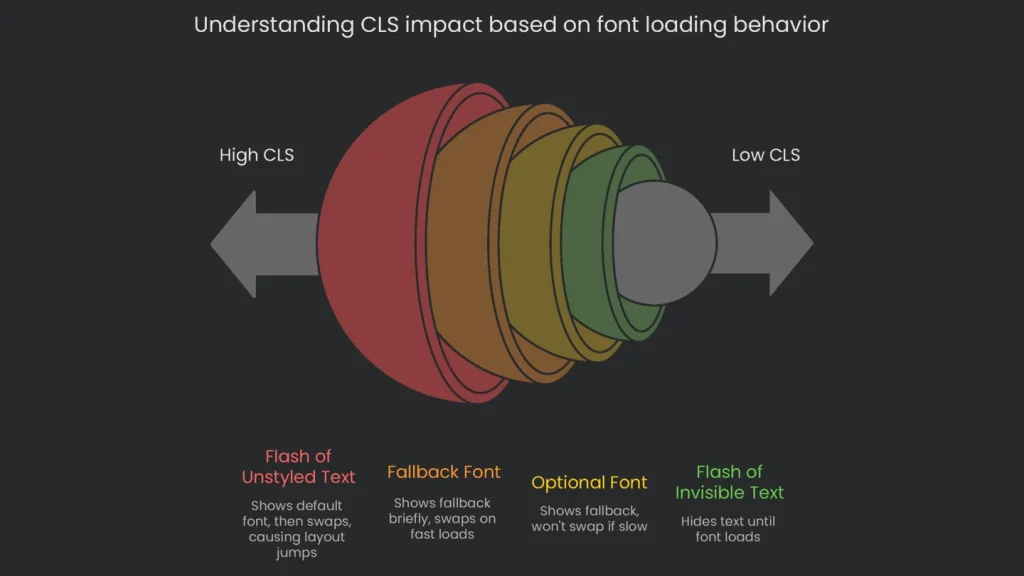
- Flash of Invisible Text (FOIT): The browser decides the text can’t be shown until the fancy font arrives. The words simply disappear. That’s a bummer for anyone reading, but the layout stays put.
- Flash of Unstyled Text (FOUT): The browser shows text right away using a plain default font, like Arial. As soon as it has the custom font, the browser swaps it in. That’s when the layout jumps. If the new font has a different size, letter spacing, or other measurements, surrounding elements get pushed around.
The Solution: Preload Important Fonts
In a standard setup, the browser waits to see the fonts when it loads the CSS. Preloading lets you nudge it to download a critical font sooner. To perform preload, plug a <link> tag into the <head> of your HTML. Just be sure to add as="font", specify the type, and include the crossorigin setting.
HTML
HTML
<head>
  …
  <link rel="preload" href="/assets/fonts/your-font.woff2" as="font" type="font/woff2" crossorigin>
  …
</head>
Don’t preload every font you’ve got—stick to the one that makes your main headline pop. Loading more than that can force other critical pieces of your page to lag behind.
The Easy Fix: Pick the Right font-display
The font-display property in your CSS lets you tame FOUT or FOIT trouble. Each setting puts a different spin on how quickly text appears. Therefore, it’s all about scoring fast loading without making the page jump.
| font-display Value | Behavior | CLS Impact | Recommended Use Case |
block | Turns off text until the font arrives (FOIT). | Low (but drags unrelated metrics down, too.) | Avoid it when possible. Use only for icon fonts that need the custom set. |
swap | Burst of fallback font, and then it swaps (FOUT). | High Risk | Use when text must show immediately and a brief jump is acceptable. |
fallback | Short blink, fallback appears, swaps only on fast loads. | Medium Risk | Fits body text when you need calm layout and decent speed. |
optional | Slight, often hidden blink, then fallback loads; won’t swap if the font drags. | Very Low / Almost None | The tidy choice: reduces shifts, keeps text fast, avoids layout fights. |
Dynamic Content: Cookie Banners Without Layout Jumps
Pair font optimizations with stable UI patterns. For example, use transforms for overlays so the layout does not reflow.
CSS
.cookie-banner {
  position: fixed;
  bottom: 0;
  left: 0;
  right: 0;
  width: 100%;
  background-color: #222;
  color: #fff;
  padding: 1rem;
  z-index: 1000;
  /* Animation setup */
  transform: translateY(100%); /* Start hidden below the screen */
  transition: transform 0.5s ease-in-out;
}
.cookie-banner.is-visible {
  transform: translateY(0); /* Slide into view */
}
Using position: fixed keeps the banner in place, and the transform property powers the slide. Because changing transform does not affect the page structure, it’s smoother than modifying top or margin. Consequently, your layout stays stable.
Building a Stable Foundation
Ending Cumulative Layout Shift is part of making a site feel polished. The rule to remember is simple: CLS happens when the browser can’t see how big something is before it appears. Therefore, from the start, give the browser dimensions for every piece that loads. As a result, the page stays calm. A predictable layout is not just for good looks; it’s also a crucial piece for the user’s experience and the site’s technical SEO. By discovering and fixing what causes sudden layout jumps, you can create quicker, friendlier websites that please real people and search engines alike.
Final Stability Checklist
Follow this list to keep your site’s CLS score nice and low:
- Images and Media: Do all
<img>and<video>elements havewidthandheightattributes to set a size? - Ads and Embeds: Is a reserved area set for ads, embedded content, and iframes, maybe using CSS
aspect-ratio? - Web Fonts: Have you preloaded critical fonts and set
font-display: optionalor another safe rule to cut shifts? - Dynamic Content: Are cookie banners and similar overlays using
position: fixedto avoid jumping the layout? - Testing: Did you check the Chrome DevTools Performance panel for jumps that pop up later, like during a scroll?
Implementation steps
- Set width and height on images or use aspect-ratio; allot space for ads and embeds in the first paint.
- Preload key fonts and choose font-display for fireworks without layout jitters.
- Delay non-key DOM loads, and insert below the fold to keep the viewport stable on render.
- Use placeholders or skeleton loading to keep SPA route flips smooth and content steady.
- Start in DevTools and field data: measure layout shift scores, shade regions, and keep tweaking
Frequently Asked Questions
What triggers CLS?
Images without size, fonts that load late, third-party embeds, and DOM shifts.
Quickest fixes?
Add width and height to images, reserve space for ads, and preload critical fonts.
How do I see CLS?
Check PSI, run Lighthouse, or use the Layout Shift Regions in DevTools.
What score is okay for CLS?
Aim for under 0.1 to deliver a good experience.
Do single-page apps create CLS on route changes?
Yes—lock the UI shell and delay DOM changes until the layout is stable.